|||
|
|
🗝 Login
🤖 Create Account
Main Menu
🚤 Model Boats
• Forum
• Build Blogs
• Media Gallery
• Boat Clubs & Lakes
• Events
• Boat Harbour
• How-To Articles
• Plans & Docs
• Useful Links
• The Games Chest
This Website
🔍 Search
📝 Guestbook
👨👩👧👦 Members (1,794)
📖 Quick Site Guide
📣 Support
👥 Membership
Hobby Supplies
🛍️ Online Shop
Not Registered
Go AD FREE & get your membership medal
BRONZE
Less Ads
SILVER
GOLD
Ad Free
Cancel
Anytime
Anytime
£2.50
£4.50
£6.50
Subscribe
Go AD FREE & get your membership medal
BRONZE
Less Ads
SILVER
GOLD
Ad Free
For A Whole Year!
£25
£45
£65
Donate
You Will Be Helping Towards:
Domain Fees
Security Certificates
iOS & Android App Fees
Website Hosting
Fast Servers
Data Backups
Upkeep & Maintenance
Administration Costs
Without your support the website wouldn't be what it is today.
Please consider donating towards these fees to help keep us afloat.
Read more
All donations are securely managed through PayPal.
Many thanks for your kind support
Without your support the website wouldn't be what it is today.
Please consider donating towards these fees to help keep us afloat.
Read more
All donations are securely managed through PayPal.
Many thanks for your kind support
Join Us On Social Media!

|

|

|
Download The App!
Login To
Remove Ads
Remove Ads
Login To
Remove Ads
Remove Ads
🏝️ About This Website
☝️ Terms of Service
🔏 Privacy Policy
Model Boats Website
Model Boats Website
Home
Forum
Build Blogs
Media Gallery
Boat Clubs & Lakes
Events
Boat Harbour
How-To Articles
Plans & Docs
Useful Links
The Games Chest
Login To
Remove Ads
Remove Ads
Trending Now
Forum
Re: SHIP MODELING: WHICH MODEL COMPANIES ARE STILL ACTIVE? WORLD OVERVIEW, CHARACTERISTICS AND PECUL
@jumpugly I had an uncle who was VP at Marx toys and a biz associate whose wife was heir to Marx fortune. As a kid xmas I got Marx sets like cowboys, space men etc. my wife got the tin car train set, which still works. My mom threw out all my Marx stuff. I never got any of the boats. Didn’t know they did any. Well back to fitting the motors in the sub.
🇺🇸 Hhager2

4 hours ago
Forum
Re: Animal and nature photos to enjoy.
Seen in Port Perry at the 9th hole on the Sunnybrea Golf course today. A Blue Heron is in the tall grass beside the water then it flew to the other side. I was fortunate enough to capture it on my camera in flight. Big wingspan and stands about 1.5 meters tall.
Earlier we saw these geese. One adult in the front, next were little ones and another adult in the back.
Last were these rare Putter birds! 🫶
🇨🇦 Ronald

5 hours ago
Forum
Re: Question of the Day?
I tapped VIEW RESULTS in the upper right corner and it came back
🇨🇦 RossM

7 hours ago
Harbour
Re: canal boat Amelia Rose
Barge lol you’ll get lynched calling her that, canal boat or narrow beam are safe unless it’s a wide beam
You want to see the look when you call someone’s £200k boat a barge it never ceases to amuse me ( I work in the industry I’ve seen it done several times )
🇬🇧 matthewwilletts

9 hours ago
Blog
Re: build blog
Hi Bob, I'm very interested in your topic but as a simple spectator, I will look at your past models with great admiration.
🇮🇹 AlessandroSPQR
18 hours ago
Forum
Re: Some photos from Woods Hole; my homeport
Three additional photos taken today on our way to Martha’s Vineyard.
🇺🇸 Chum444

18 hours ago
Forum
Re: New planing hull design.
@ChrisF
Hi Chris
you wrote:
"""""""""""""Evening Alessandro - the drawing was primarily for interest and to show how twin prop shafts are often positioned rather than suggesting it was the best hull design for your needs.""""""""
*Perfect, that's what I meant and thank you very much, you understood exactly what I needed.*
you wrote:
""""""""""Whilst I have provided detailed information on some aspects, for example the vee hull and narrowing on plan as you move towards the stern I've been conscious of not trying to impose my own design preferences on you - not that, that would happen! Like me you ask for and research information and then make your own decisions based on what you want. Quite right!""""""""""""""
*We're on the same page.*
you wrote:
"""""""""""You don't need to worry about it planing. Anything from a flat bottom to a deep vee will do that, just that the deep vee will do it at a lower point below the water surface than a flatter hull.
*I like this about your advice. The very direct approach based on experience. Clear and concise answers. Thank you so much. They are infinitely helpful. I'm taking advantage of your experience (I'm new to planing hulls). You can't understand how useful this simple statement of yours is for me to continue.*
You wrote:
""""""""""I know that the drawing is to show the submerged volume, but don't forget that the chine and chine rail will curve upwards at the bow.""""""""""""
*So I ask you: why does the drawing seem to you like there's no upward curvature? Is it too subtle?*
🇮🇹 AlessandroSPQR
18 hours ago
Blog
Re: build blog
I agree @ChrisF in fact, any faster would spoil it i think.
🇬🇧 Madwelshman

20 hours ago
Blog
Re: build blog
@jumpugly
Jumpugly is already beautiful like this, after aging it will be a masterpiece.
🇮🇹 AlessandroSPQR
24 hours ago
Forum
Re: Animal and nature photos to enjoy.
@RNinMunich
I guess I never thought of it that way.
But .... yeah ... I guess one could call it that.
Dave
Here is a link to a great YouTube video discussing the Loon's "Wail" (call).
https://www.google.com/url?sa=t&source=web&rct=j&opi=89978449&url=https://www.youtube.com/watch%3Fv%3D4ENNzjy8QjU&ved=2ahUKEwjF59iYh-KUAxUghisGHeXlCCkQwqsBegQIGBAB&sqi=2&usg=AOvVaw0v1lY5gCc880KW47MXkC-b
🇺🇸 DWBrinkman

1 day ago
Harbour
Re: HMCS Snowberry - Revell 1/72 basic kit RC Conversion
@TonyG thank you, I didnt know Tamiya made a Flower Class... Time is always an issue, but for me creating something gives me a chance to focus and to forget everything else, giving me ood mental health - but I do have to pivot from hobby to hobby to prevent getting burned out in any one field - drone flying, leatherworking, hobby blacksmithing - I will do one while inspired and then pivot back into another... Autumn to Spring is indoor work, so leatherworking, forging, or model making; summer and hot weather are for drone flying and running...
🇬🇧 Summerisle
1 day ago
Event
Re: Modelboat&modeltrain day
Looking forward to seeing your pictures of the event!
Dave B
🇺🇸 DWBrinkman
2 days ago
Gallery
Re: gallery
Thanks @jumpugly , appreciate the kind sentiment :)
🇬🇧 Summerisle
2 days ago
Event
BMMMS OPEN DAY
Just a quick reminder that Sunday 7th June 10:00am till 4:00pm.
Bury model boat club are having an open day with a large seperate Bring & Buy,
there will be hot food and drinks available plus large car park, we would love you to visit our lake and make new friends.
Bury Metro Marine Modelling Society
Clarence Park Lido
BL9 6NG
Cheers Pete
🇬🇧 Rookysailor
3 days ago
Blog
Re: build blog
What size linear servos are you looking for?
🇬🇧 ChrisF

3 days ago
Blog
Re: build blog
@ChrisF
This looks like the start of another exceptional build.
Converting the original plans to 1:10 scale while staying faithful to the authentic materials is a wonderful approach.
The frame work already shows great precision, and I look forward to following the progress of this beautiful Pinky.
Fair winds with the project!
🇺🇸 chugalone100
3 days ago
|

Account Updated
Changed Avatar
Summerisle2 hours ago
New Promotion
Recruit
 tonyb2
2 hours ago
New Promotion
Able Seaman
 Jumbles1943
2 hours ago
New Promotion
Master Seaman
 BernhardP
2 hours ago
New Promotion
Leading Seaman
mjbb19512 hours ago
New Promotion
Leading Seaman
DenisA2 hours ago
New Promotion
Master Seaman
jostro652 hours ago
New Promotion
Able Seaman
Javelin13 hours ago
New Promotion
Able Seaman
Ticker3 hours ago
New Promotion
Able Seaman
BOB276003 hours ago
New Promotion
Able Seaman
MarkS33 hours ago
Account Updated
Changed Avatar
fireboat3 hours ago
New Member
United Kingdom
MiniSal3 hours ago
New Member
peterb95 hours ago
New Member
India
SwapnilS7 hours ago
New Promotion
Leading Seaman
matthewwilletts9 hours ago
New Member
Belgium
valecu1 day ago
New Member
United Kingdom
LeeR2 days ago
New Promotion
Leading Seaman
Summerisle3 days ago
New Member
United Kingdom
PeterC73 days ago
Account Updated
Updated 'About Me'
Summerisle3 days ago
Account Updated
Updated Signature
Summerisle3 days ago
New Member
United Kingdom
Summerisle3 days ago
New Promotion
Warrant Officer
 gcladd
3 days ago
New Promotion
Chief Petty Officer 2nd Class
 Frankiesays1953
3 days ago
New Member
Netherlands
Peterv14 days ago
New Member
United Kingdom
kevinh24 days ago
New Member
United Kingdom
nickvosper4 days ago
New Member
United Kingdom
JohnC104 days ago
New Member
Canada
RichardL55 days ago
New Member
South Africa
StewartR5 days ago
New Promotion
Warrant Officer
AndyB26 days ago
New Member
United States
KenP7 days ago
New Member
United Kingdom
alwynj7 days ago
Birthday This Week
Turns 75
RonH7 days ago
Account Updated
Updated 'About Me'
Titchdrums7 days ago
New Member
United Kingdom
jiml18 days ago
New Member
United Kingdom
Austin8 days ago
New Member
New Zealand
WRC9 days ago
New Promotion
Able Seaman
Plivez10 days ago
New Member
United Kingdom
PeterK310 days ago
New Promotion
Chief Petty Officer 2nd Class
Willem10 days ago
New Member
United Kingdom
MarkS411 days ago
New Member
United States
puttn11 days ago
New Member
Turkey
MUSTAFAA11 days ago
New Member
United Kingdom
anthonyc11 days ago
New Promotion
Chief Petty Officer 1st Class
 Nick Ward
12 days ago
New Member
United Kingdom
KevinP212 days ago
See More
Forum Topics
Animal and nature photos to enjoy.
@Ronald
Beautiful birds Ron!
10 hours ago by 🇮🇹 AlessandroSPQR ( Fleet Admiral)
Fleet Admiral)
Non-Hobby Chat
12 Posts
44 Likes
44 Likes
Started
2 days ago
by GaryLC
2 days ago
by GaryLC
Latest
10 hours ago
by AlessandroSPQR
10 hours ago
by AlessandroSPQR
SHIP MODELING: WHICH MODEL COMPANIES ARE STILL ACTIVE? WORLD OVERVIEW, CHARACTERISTICS AND PECULIARI
@jumpugly I had an uncle who was VP at Marx toys and a biz associate whose wife was heir to Marx fortune. As a kid xmas I got Marx sets like cowboys, space men etc. my wife got the tin car train set, which still works. My mom threw out all my Marx stuff. I never got any of the boats. Didn’t know they did any. Well back to fitting the motors in the sub.
4 hours ago by 🇺🇸 Hhager2 ( Lieutenant)
Lieutenant)
Website Related
20 Posts
44 Likes
44 Likes
Started
21 hours ago
by AlessandroSPQR
21 hours ago
by AlessandroSPQR
Latest
4 hours ago
by Hhager2
4 hours ago
by Hhager2
Question of the Day?
Thought that was a sword (Game of Thrones)
10 hours ago by 🇬🇧 SouthportPat ( Commodore)
Commodore)
Website Related
5707 Posts
14345 Likes
14345 Likes
Started
3 years ago
by fireboat
3 years ago
by fireboat
Latest
10 hours ago
by SouthportPat
10 hours ago
by SouthportPat
Some photos from Woods Hole; my homeport
Three additional photos taken today on our way to Martha’s Vineyard.
18 hours ago by 🇺🇸 Chum444 ( Commodore)
Commodore)
Non-Hobby Chat
3 Posts
21 Likes
21 Likes
Started
7 days ago
by Chum444
7 days ago
by Chum444
Latest
18 hours ago
by Chum444
18 hours ago
by Chum444
New planing hull design.
@ChrisF
Hi Chris
you wrote:
"""""""""""""Evening Alessandro - the drawing was primarily for interest and to show how twin prop shafts are often positioned rather than suggesting it was the best hull design for your needs.""""""""
*Perfect, that's what I meant and thank you very much, you understood exactly what I needed.*
you wrote:
""""""""""Whilst I have provided detailed information on some aspects, for example the vee hull and narrowing on plan as you move towards the stern I've been conscious of not trying to impose my own design preferences on you - not that, that would happen! Like me you ask for and research information and then make your own decisions based on what you want. Quite right!""""""""""""""
*We're on the same page.*
you wrote:
"""""""""""You don't need to worry about it planing. Anything from a flat bottom to a deep vee will do that, just that the deep vee will do it at a lower point below the water surface than a flatter hull.
*I like this about your advice. The very direct approach based on experience. Clear and concise answers. Thank you so much. They are infinitely helpful. I'm taking advantage of your experience (I'm new to planing hulls). You can't understand how useful this simple statement of yours is for me to continue.*
You wrote:
""""""""""I know that the drawing is to show the submerged volume, but don't forget that the chine and chine rail will curve upwards at the bow.""""""""""""
*So I ask you: why does the drawing seem to you like there's no upward curvature? Is it too subtle?*
18 hours ago by 🇮🇹 AlessandroSPQR ( Fleet Admiral)
Fleet Admiral)
Building Related
52 Posts
73 Likes
73 Likes
Started
13 days ago
by AlessandroSPQR
13 days ago
by AlessandroSPQR
Latest
18 hours ago
by AlessandroSPQR
18 hours ago
by AlessandroSPQR
|
|
Login To
Remove Ads
Remove Ads
Build Blogs
13 Posts
6 Followers
120 Likes
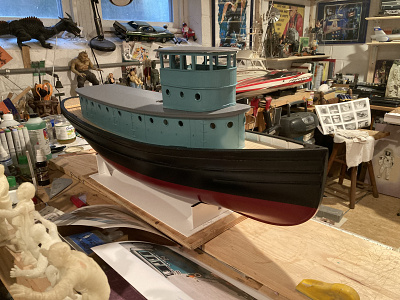
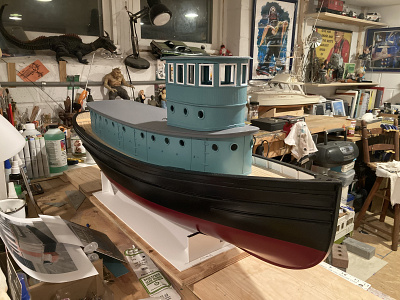
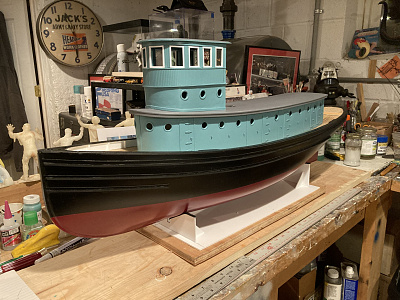
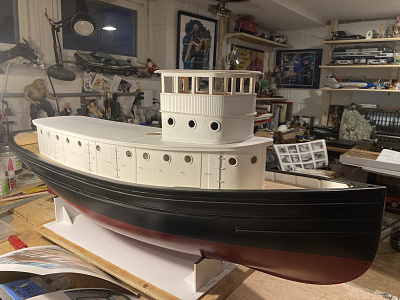
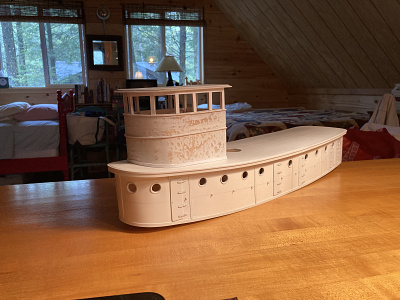
The Brooklyn Tug
Well my friends, I've gone and done it again.
Through some dumb luck I stumbled upon a reasonably priced discontinued bucket-list kit that I've always had my eyes on and took the plunge. Even a blind squirrel finds a nut once in a while! The Dumas Brooklyn Tug was one of their best kits and much to my surprise it came with a very strong set of directions...unusual for Dumas in my humble opinion.
Be that as it may, it's a large (40 inches) and quite a beautiful kit. The version I was lucky enough to find was the final version before Dumas dropped it. The first version (I understand) from way back in the day was meant to be a plank- on-frame build. But it seems Dumas felt it would not sell well, not to mention the wood production problems it would incur. So they engineered a fiberglass hull that became highly prized to builders. My version is the last version with a PVC hull.
The hull is nice, but the two hull molds come with a ton of excess PVC and feel like wobbly bathtub parts coming out of the box. Very worrisome to start, as cutting the mold flanges away was not a simple task, no to mention Bondo and a ton of sanding...yes, with mask on and vacuum at the ready.
Next came a heavy inner fiberglass keel inlay, an addition PVC skeg support. Then an outer long false keel is installed with the stuffing box installation...more Bondo and sanding. Uggh.
Worrisome or not, the instructions have a tongue-and-cheek feel about them as the writer and engineers slip in comments like "no need to worry" and "now don't panic!"
Sheesh!!!!
So, after a couple of days of bitching and worry I managed to get the two halves joined and on the stand.
The next issue is the PVC deck with the basswood supports. The joining of these two deck halves was not the "issue," but the total lack of wood decking aggravated me. I want a more scale appearance, so I have to have a planked deck! As a result of my own needs I lowered the deck supports 1/8th of an inch to accommodate my planking. I did a scale deck test shot to get an idea of what I'm after.
Believe or not, the PVC hull will not be fully "true" until you squeeze the deck halves with the bass cross-members into it.
I know, it's weird.
So I will trace the deck shape onto paper and do my planking as a side project to begin this weekend. Call me crazy, but my instinct is pushing me in that direction. I am going to give it a go.
My wife, Mary is like, "Where are you going to put that one?" "In the water!" I shoot back, "then on the mantle, because it's going to be a like museum scale!" Don't you get it?" I think she's glad I have this hobby...it keeps me from pestering her for other things.
Onwards and upwards and more to follow.
Best -- Guy
🇺🇸 jumpugly

2 days ago


6 Posts
2 Followers
33 Likes
Swallow - the most famous dinghy?
This is a kit from Clyde Model Dockyard of Swallow - from the stories of Swallows and Amazon
https://www.clydemodeldockyard.com/shop/p/clinker-boat-model-kit
It could be argued that this is the most famous dinghy in the world? The kit is very well designed and manufactured. However, there is minimal advice about making it into a RC sailing model which I want to do. The kit was featured in the April edition of Model Boats magazine here in the UK - although the model was well made in the article it was not a sailing model.
🇬🇧 AndyB2
3 days ago


9 Posts
1 Follower
48 Likes
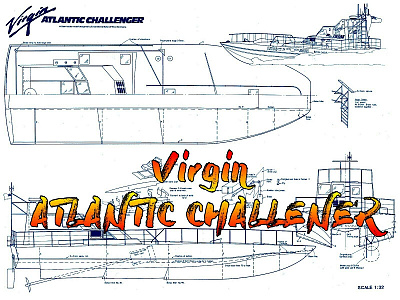
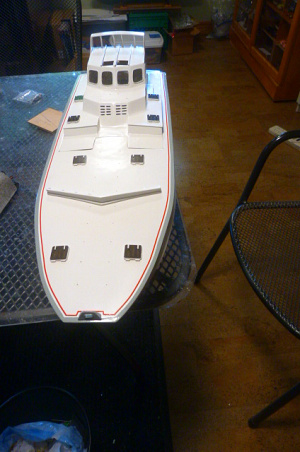
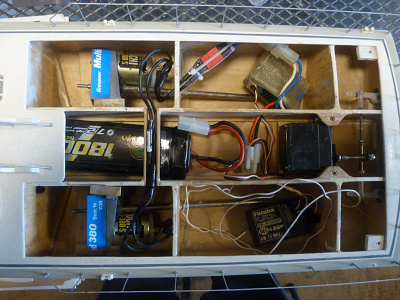
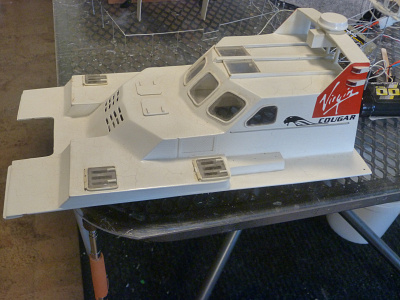
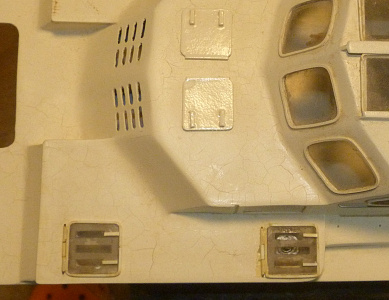
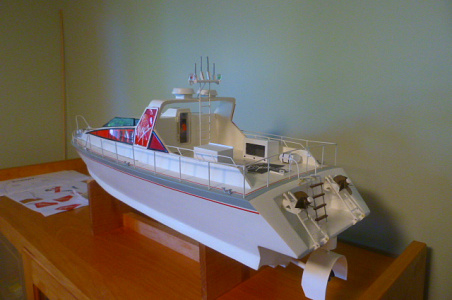
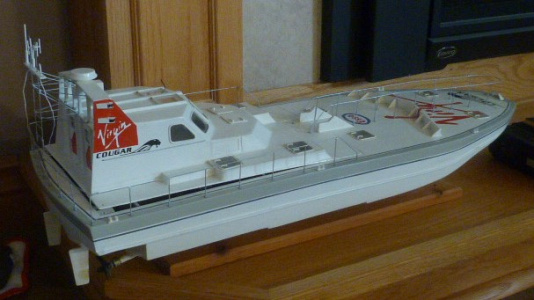
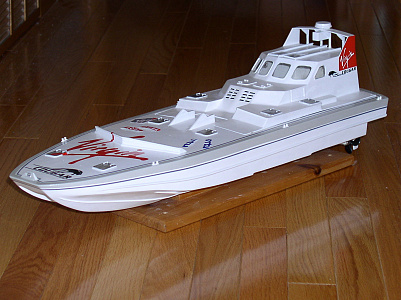
Virgin Atlantic Challenger 1 - the restoration
This is a model that I built many years ago. Soon after the Richard Branson’s Virgin Atlantic Challenger met it’s tragic fate in 1985, Radio Control Boat Modeller published a semi-scale 1/32 (3/8” = 1’) plan in the January/February1986 issue created by Ernst-Bernd Bahn of West Germany (German unification, seems like a long time ago) to build this classic tunnel hull vessel.
🇨🇦 gcladd
4 days ago


29 Posts
12 Followers
175 Likes
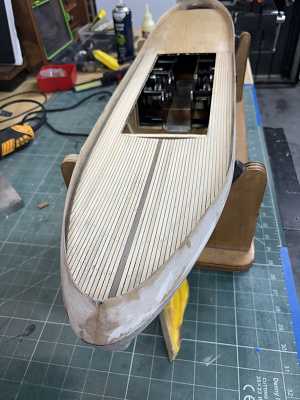
1/24 RAF 68Ft Vosper RTTL
This will be my first boat build at this scale, so who knows how it will turn out.
I got a set of Vic Smeed's plans from Sarik Hobbies along with their wood packs for the model - I thought having some laser cut parts might be helpful.
I grew up in Alness, so if the build goes well I'll probably paint it as 2757 which was based at 1100 MCU Alness/Invergordon in the late 1950's to early 1960's.
🇬🇧 peterbro
4 days ago


25 Posts
13 Followers
177 Likes
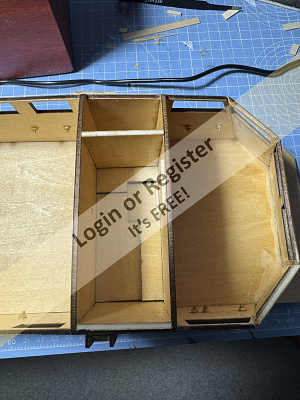
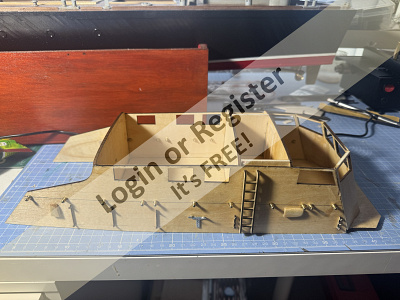
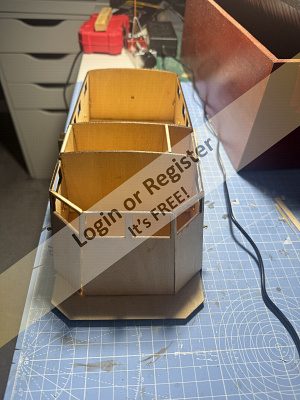
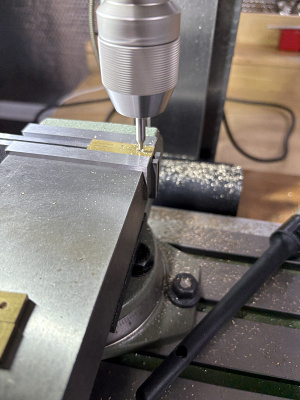
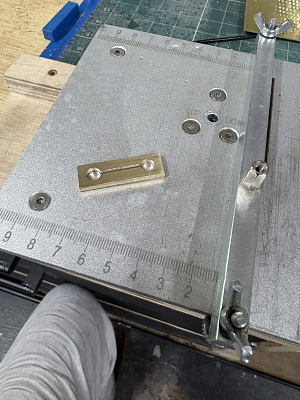
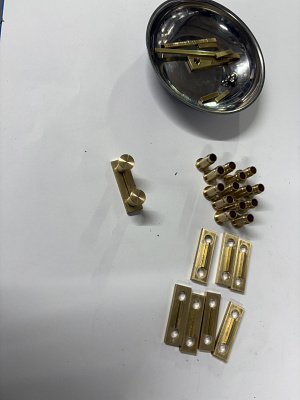
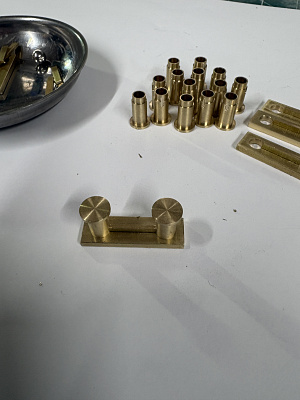
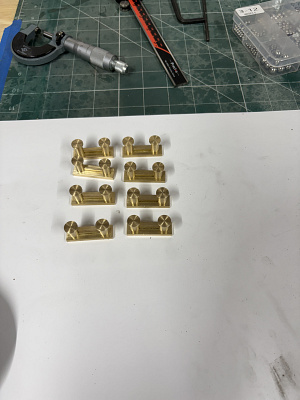
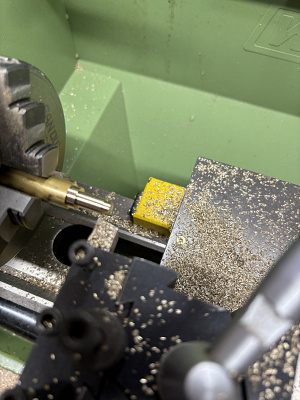
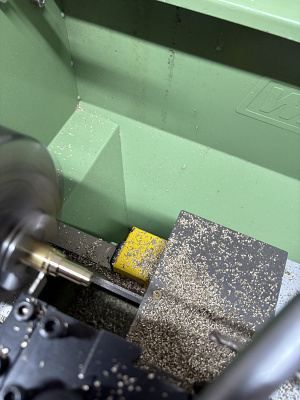
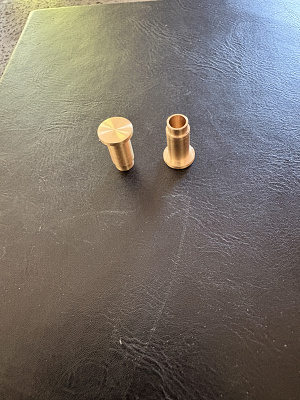
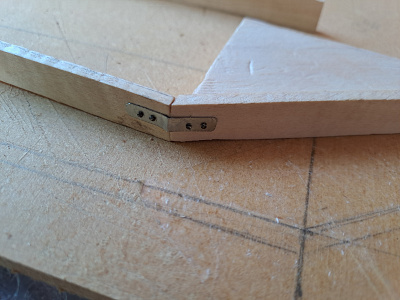
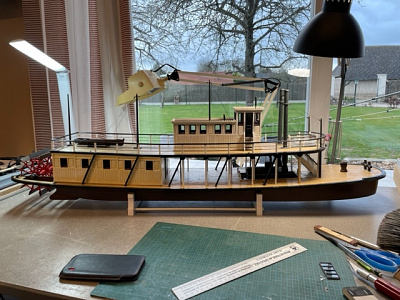
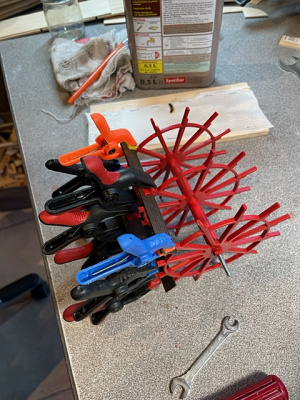
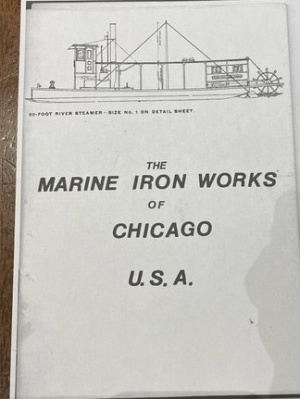
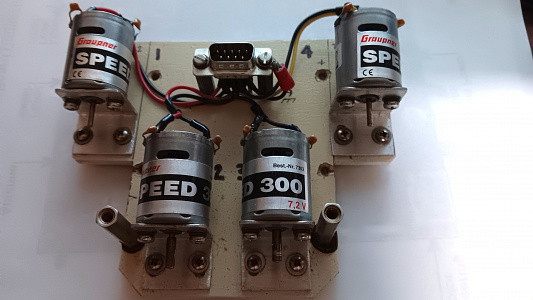
Forceful Directors Class Paddle tug
I’m in the middle of building a 1:48 Directors‑class paddle tug — Forceful.
I’m using the fibreglass hull and working from plan No. 1292, plus the two Marine Modelling International articles from Jan/Feb 2017.
The paddle wheels are built from drawing No. 1293, and every part of the feathering mechanism has been machined from raw stock. Only the bearings and fixings are bought in.
The feathering wheels and drive are now complete, and I’ve set up a small test tank so I can run a wheel under load before moving on.
Hopefully you’ll enjoy following along with the build.
🇬🇧 Kevin55
4 days ago


7 Posts
6 Followers
32 Likes
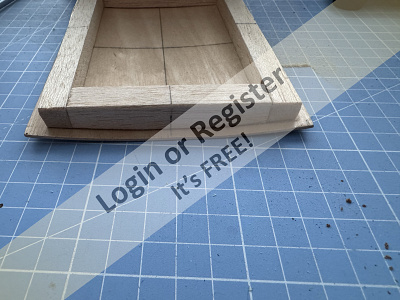
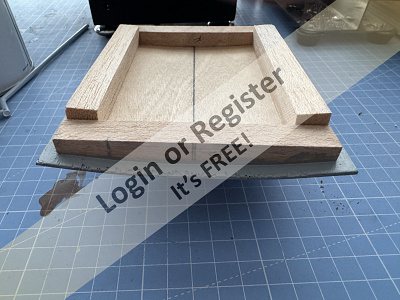
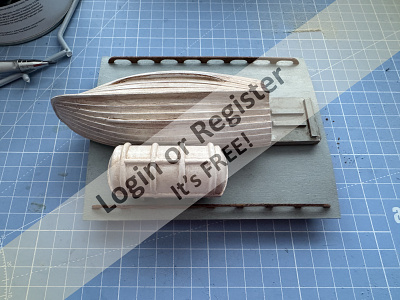
LESRO/AEROKITS/SLEC SEA URCHIN
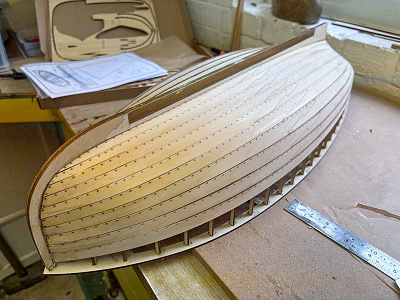
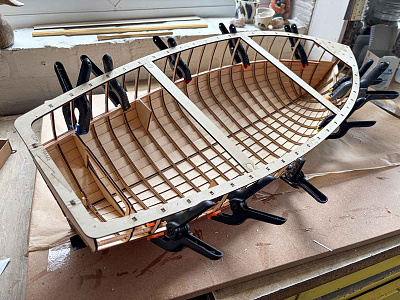
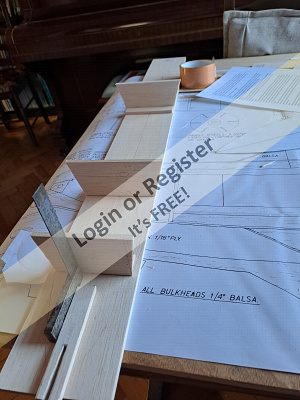
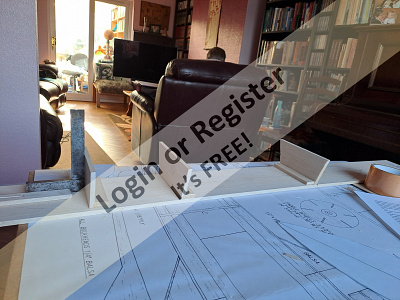
I decided to start this following a suggestion from one of you on this website, that the smaller Lesro designs such as the Sea Urchin, Sea Nymph and Fast Patrol Boat would perhaps be able to be sailed relatively safely on my backyard pond with reduced power settings.
As I have most of the plans for these designs, it stood to reason that my severe building addiction could be somewhat satisfied in the background whist trying to solve arising issues on another much larger build I had already embarked on but which had stalled for the time being (namely Vivacity).
So here goes with just a few pics to set the ball rolling;
1) 20FEB2026 - measuring and transferring shape of parts onto paper templates and balsa - I decided to use balsa for most of the frame as I had plenty, and I find it much easier to work with on smaller boats. And the model was for modest electric power, not small diesel, so it should be plenty strong enough if the outer hull is covered with tissue, as on the Knocker White Tug model completed earlier.
2)&3) Keel and bulkhead parts cut from 3/16" balsa. Keel doublers glued on first side using exterior grade PVA, all excess 'splurge' immediately wiped away using damp rag - I cannot stress enough the importance of this, as it really minimises/eases the 'fettling' required to fit bulkhead/other parts as the build progresses.
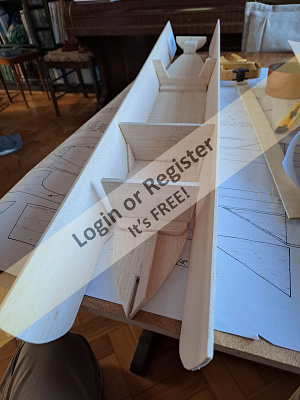
4)Keel assembly turned over and propshaft 'slot' cut away/filed.
5)Remaining keel doublers glued with PVA, as well as 5 minute epoxy around prop shaft/keel/doubler sandwich.
6)Bulkhead shapes reinforced with scrap 1/16" balsa crossgrain at edges where slots are to be cut, creating a sort of 'liteply'.
7)Keel assembly completed with proptube reinforcement and bow doublers glued. Bulkhead slots for cabin sides/keel cut.
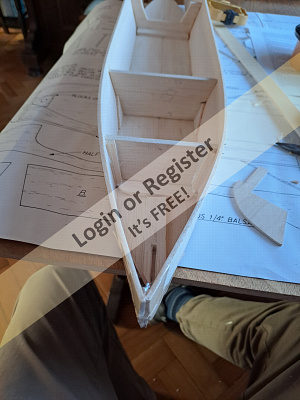
8)Fettling and test fitting bulkheads to keel - and a celebratory glass of Henkell Trocken to mark the progress to date - 01MAR2026.
More to come once I've done this weekend's property jobs!
Best regards to all reading,
Nick
🇳🇿 Nick Ward
4 days ago


3 Posts
0 Followers
15 Likes
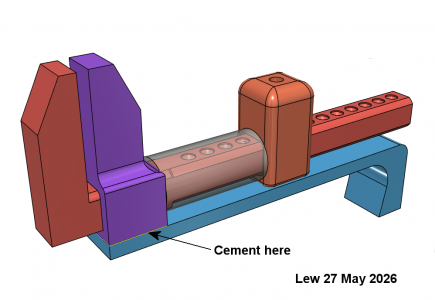
"F" Clamp - spring loaded
I just had a need to clamp some parts together in a tight space and none of my other clamps would work. I came up with the _spring loaded clamp_ and thought that if any of you need one I can email (PM me) you the OBJ (for 3D Printer) file. Similar clamps use a little wedge but often slip. The pressure is applied to the moving jaw and is adjustable for varying work thickness. The hole in the adjustable ferrule is .05inch (1.27mm) and can be drilled out and tapped for a screw. The screw only needs to be finger tight to avoid slipping. The spring is about .31inch (7.8mm) ID and the length can be about 1inch (25mm)
+After I printed these I saw the need for making this a one hand operation, so I added the "L" shape trigger to pull the sliding jaw back. It will be cemented to the sliding jaw as seen in the assembly CAD drawing. (I will upgrade mine tomorrow.)+
Lew
🇺🇸 LewZ
5 days ago
23 Posts
9 Followers
129 Likes
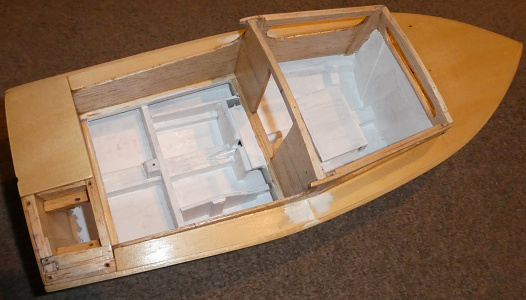
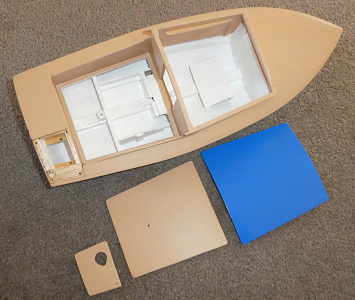
36 ft Northern Bay sport fisherman
The Northern Bay lobster and sport fishing boats are built in Qgunquit, Maine. Known as Down East boats they are semi-displacement hulls. They are very good sea boats stable in heavy seas. Compared to semi-vee hulls common to many other sport fisherman boats in the U.S. the Down East hulls tend to be wet boats. As with everything else, boat design is always a compromise.
1&2 The inspiration
3&4 Beginning steps
🇺🇸 Chum444
6 days ago


6 Posts
5 Followers
47 Likes
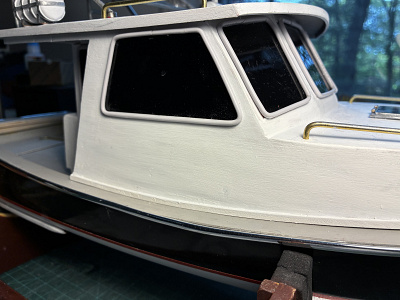
Model Slipway Vosper RTTL
Hi y’all. The Tug formerly known as Harbor is now in her berth, flagged, and is now known as the O Wulf 8. She’s done!! Well..mostly. Got a couple more things to do to her, but she’s out of the shipyard, which means another project must commence. Union rules Y’know…I’m not union, but the gremlins in my garage are…
Anyway, I WAS going to start one of the kits that’s been in my hoard for a while, but I decided to build a birthday kit. She’s the Model Slipway Vosper RTTL. It was in my wishlist on Ages of Sail, my wife picked it out of a list I gave her. Woman knows my heart. Anyway, I wanted something relatively simple, although the kit does have some head scratching moments.
To start off, it’s a nice kit. Molded hull, deck and superstructure, good brass and plastic, printed plastic parts and white metal fittings. The downside is the 2mm shaft and tube, press on propeller and a rubber tube coupling. First thing I did was find a suitable tube and shaft in my stash, I like 4mm and 1/8th inch. Found an unused Dumas 1/8 tube and shaft that was just a wee bit longer, so I chose that and a 3 blades prop with a 3mm hole that I gently cleaned out to 1/8.
The kit is designed to be powered by a 6 volt Speed 400, and one was included, but I’m going brushless with this build.
First thing after cutting out the hull, deck and interior liner is to clean up and trim, then you’re supposed to build up the rudder from 2 abs halves and a metal shaft. I had a commercially made rudder that was the right shape and size, so I chose that and a 3mm ID tube. Now, the builder is supposed to make sure the liner fits, then tape it in place so one can drill the rudder tube hole thru the hull and up into the aft part of the liner. I thought I’d be able to just hold it in place. And, of course, it slipped leaving me with an elongated hole too far forward. Looking at the plans, the tube comes thru the bottom of the hull and is glued ther and at the liner. No reinforcements on the hull bottom. So, me being me, I found a nice piece of hard balsa, drilled to fit, and then slid that over the tube, and used black ca on the bottom of the hull and used epoxy to glue the tube and block inside. I made the offending hole in the liner a little bigger, and once it was glued in i made up a plate to go over the tube, the glue the plate to the tube and topside of the liner. Before I could accomplish that, I had to mod the liner to accept my choice of brushless outrunner. Plus I had to cut the slot for the stuffing box. Once I had all that done, I tacked the tube in place with ca, made sure it was lined up, the used tape on the bottoms of the hull to keep excess epoxy from running out and then glued it home.skeg was installed at this time. Then I installed the modified liner. I made up my motor mount and installed it and the motor. I tacked the mount in place with the motor installed to make darn sure the motor, shaft and coupler were a slip fit with no binding, then I bonded the mount to the hull and liner. After that I installed the deck, and the spray rails. You’re supposed to cut the strip from tha plastic sheet, but I cheated and used some strip styrene I already had.
The superstructure has been started. I’ve got the aft bulkhead, aft bulkhead outside fairing doublers, cockpit and windbreak installed. At this point I have to measure the drawing on the plans to mark the windows, then tape 2mm strips in position, glue the strips and uprights at the window locations, cut away the unglued excess strip, then cut the windows out. I’ll probably get the locations marked this week, and get the horizontal strips taped down, then wait till this weekend to finish that job.
Cash
🇺🇸 Cashrc
8 days ago


2 Posts
2 Followers
8 Likes
Nina, Windermere style Edwardian paddle steamer
This is a scratch build from a plan designed by Basil Hardy and purchased last year. Its inspiration is from a photograph of Charles Fildes 'Fairy Queen' in the archives of the Windermere Nautical Trust.
I chose it following a gift of a Meccano steam engine which was the power for Basil Hardy's paddle steamer. These lakeland steamers were very much family possessions. The plans include a design for the drive unit as well as the hull.
🇬🇧 ColinJ2

8 days ago


1 Post
0 Followers
8 Likes
Dessin et modelisme
Construction tradi avec impréssion 3D à partir d'un plan récupéré sur un dépliant commercial
🇫🇷 BOB27600
9 days ago

2 Posts
0 Followers
8 Likes
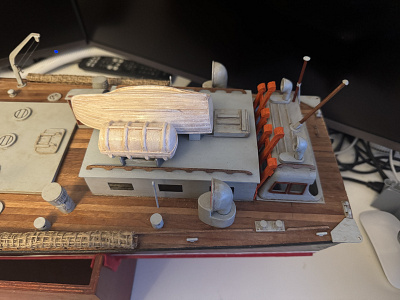
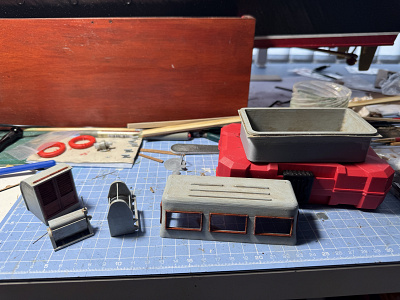
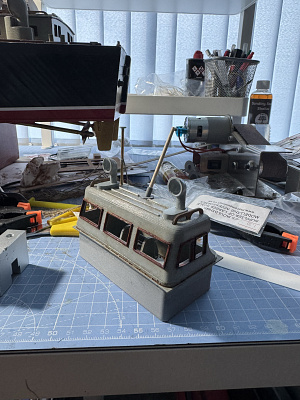
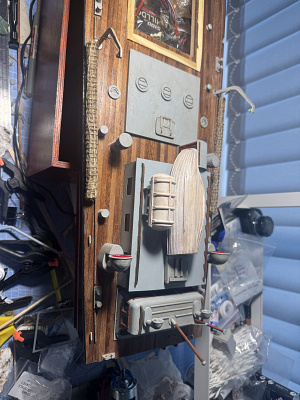
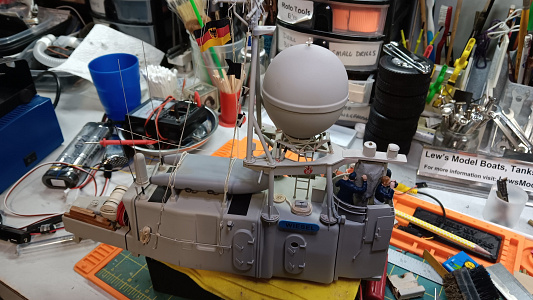
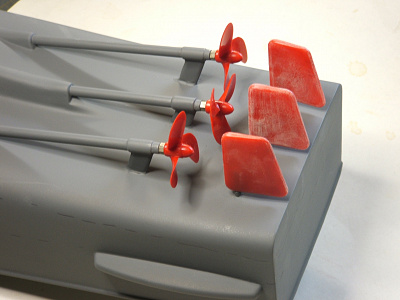
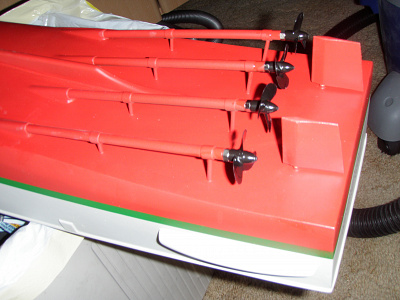
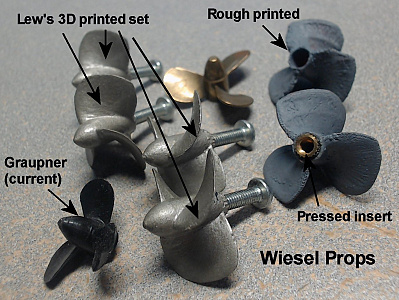
"I'll Be Back" The Wiesel overhaul 2026
Well, I finally decided on my next project: *Overhaul the Schnellboot +Wiesel+*.
_I bought this Graupner kit in 1975_ in London while we were doing some European travelling. Started working on it until "the kids" came along. I placed it in my attic (bad choice with the heat in Florida) then decided to _resume working on it again in 2003_. By then there was a lot of new information and photographs on these +Zobel+ Class type 142A Schnellboots. So I decided to rip it apart including the conversion to four motors and shafts. That required making a large part of the aft under hull off.
At this time I decided to change the interior access cutout. This was a massive rectangular cutout leaving long seams with hold down levers. I decided to re-cover the deck and make several individual cutouts avoiding almost al seams and making the deck/hull stronger. The down side is that it makes it harder to access the inside components.
Skip forward a few years and it was complete. _The first run was in January 2012_. The boat looked great but the performance was pathetic. Those little conventional shaped propellers would not make the boat move very fast. For the next few years I would bring it to model boat meets (back the the +Bay Area Electric Boaters+). I had only two RC boats back then, +Wiesel+ and my +Standard Oil+ tug. As I built more boats the +Wiesel+ dropped out of the picture.
_How could I do that to my best looking boat_?
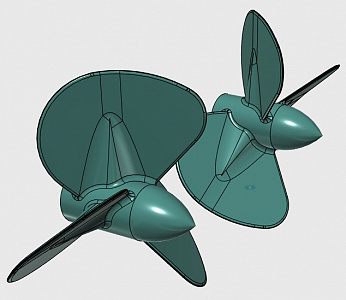
In 2018 I got my first 3D printer. Upon finding a photo of what the real Schnellboot props looked like I thought that the model needed this upgrade. But with scale boats and tanks I had no time to complete the mission. Even my upgrades fell behind and my "to Do" list grew.
So, yesterday I had to make a decision: Which would be my next project? (Last month was the 51st anniversary since I bought the kit,) So the Wiesel won the lottery and I am going through everything, stripping out all of the electronics. It will take a little while in converting from the old style to the newer, more compact and direct wiring.
The first thing I am working on is getting the Loran turning again. The modified servo stopped working and it was embedded into the superstructure.
I am attaching a few photos for you to view.
Sorry US Coast Guard Cutter, Fireboat, Towboat, and Frederic Mistral tug. Sorry King Tiger, M26 Pershing, M10 trailers, M1 Abrams, second King Tiger, Deuce and a half, Semi- lowboy, and boom crane. You will have to wait in the queue.
I also have more on the Wiesel in my harbor here on on my web site (see link).
Lew
https://www.rcflorida.org/lmb/lmbwiesel/
🇺🇸 LewZ
10 days ago

|
|

Media Gallery
HMCS Snowberry - 1/72nd scale Revell RC Conversion - Sea Trials
3 days ago by Summerisle
Anyone Recognise This Boat Kit ?
5 days ago by SouthportPat
KMBC Lifeboat Day
18 days ago by EdW
Onboard my Robbe Atlantis
21 days ago by HappyHaggis
Model boat club at Hamilton Steam Museum
7 days ago by GARTH
SSMBC (Seminole, Florida, USA) Meet, May 17, 2026
13 days ago by LewZ
IMAI CHEBEC (Xebec) – 1/80 Scale Plastic Sailing Ship Model
16 days ago by chugalone100
Steam Launch
18 days ago by EdW
KMBC Lifboat Day Continued
18 days ago by EdW
Knightcote Model Boat Club open day
20 days ago by EdW
SSMBC meet on May 3, 2026.
29 days ago by LewZ
Real images vs. AI-altered images
1 month ago by AlessandroSPQR
|
|

Login To
Remove Ads
Remove Ads
Boat Clubs & Lakes
Recent Updates In Places

|
Southport Model Boat Club
2 months ago by 🇬🇧 SouthportPat (
Commodore) |
|
|
Buxton Model Boat Club
3 months ago by 🇬🇧 philcaretaker (
Commodore) |
|
|
Clube de Aeromodelismo de Setúbal
3 months ago by 🇺🇸 PhilS1 (
Recruit) |
|
|
Aberdeen Model Boat Club
4 months ago by 🇬🇧 tim morland (
Chief Petty Officer 1st Class) |
|
|
Black Mountain Radio Sailing Club
5 months ago by 🇺🇸 oefranz (
Master Seaman) |
|
|

Upcoming Events

|
May
31 2026
|
1 Day Only!
|
Paul Robinson Regatta. (Pond Yacht)
Ended 2 days ago
|
|
|
May
31 2026
|
1 Day Only!
|
Modelboat&modeltrain day
Ended 2 days ago
|

|
Jun
7 2026
|
1 Day Only!
|
Edina Model Yacht Club "Parade Of Boats"
Starts 5 days time
|
|
|
Jun
7 2026
|
1 Day Only!
|
BMMMS OPEN DAY
Starts 5 days time
|
|
|
Sep
26 2026
|
Sep
27 2026
|
The BIG St.Albans Model Show
Starts 4 months time
|
|
|
Boat Harbour
1 Photo
11 Likes
canal boat Amelia Rose
another marketplace purchase getting a fleet of barges
🇬🇧 Stephen T
22 hours ago
8 Attributes
4 Comments
8 Photos
12 Likes
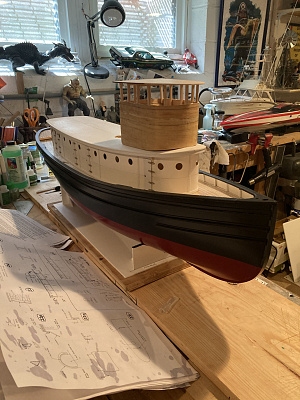
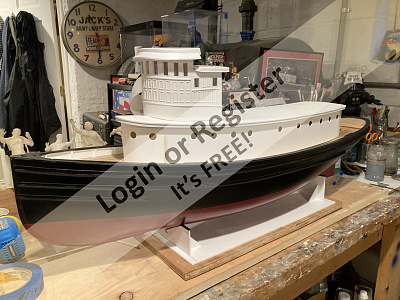
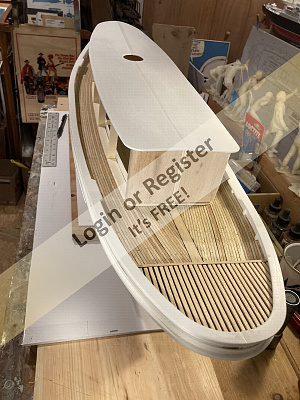
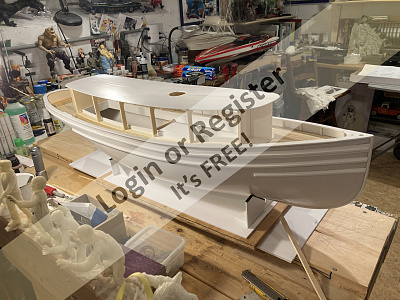
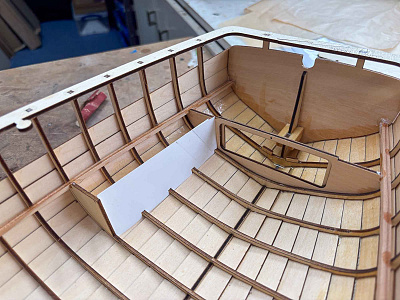
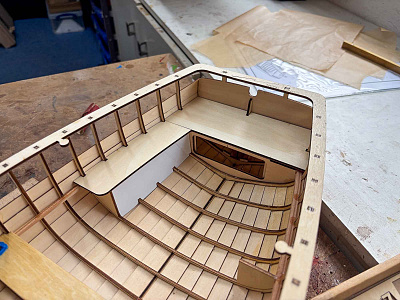
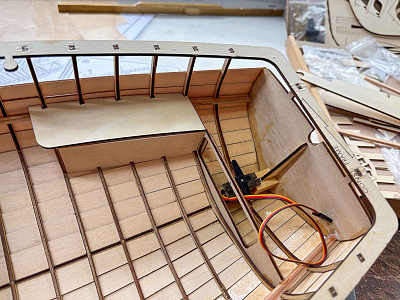
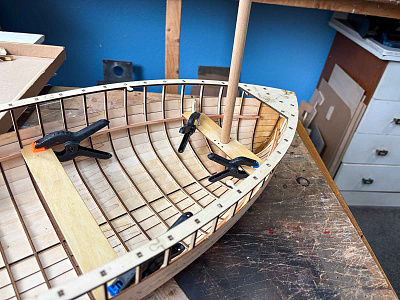
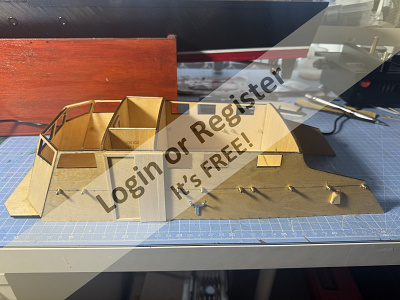
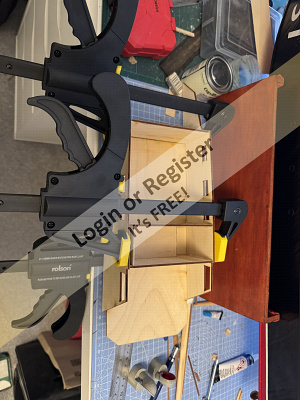
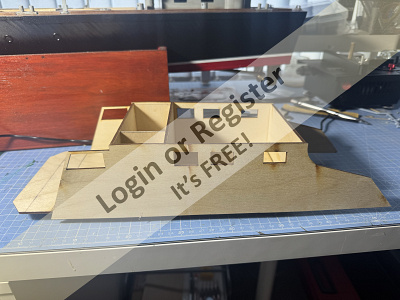
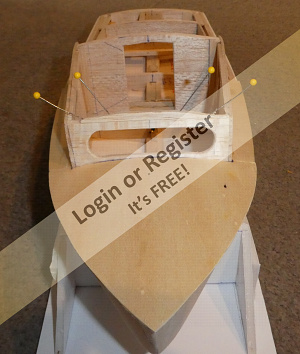
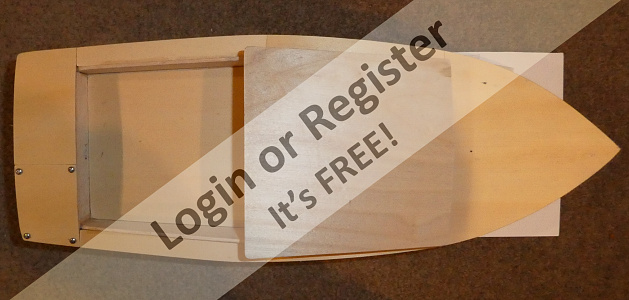
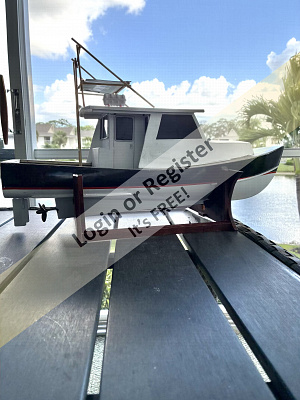
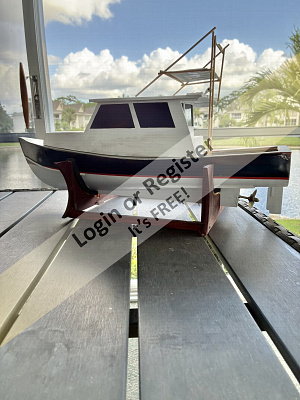
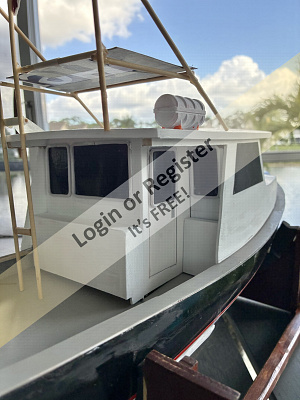
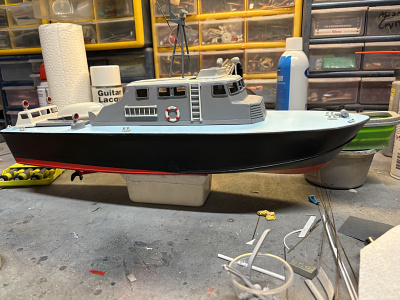
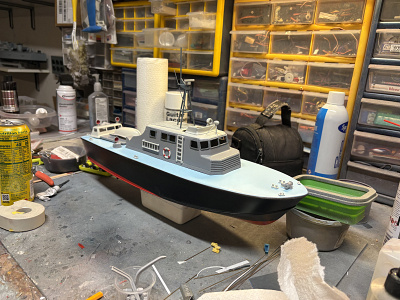
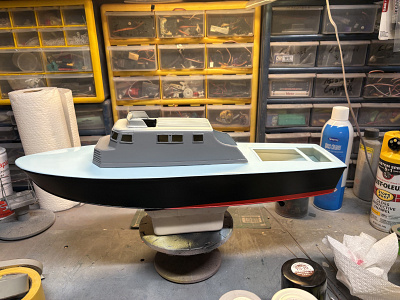
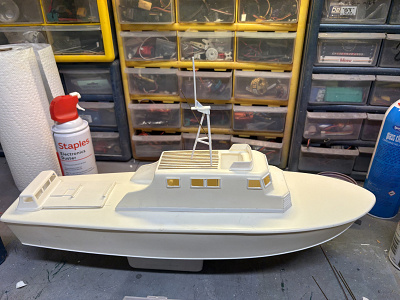
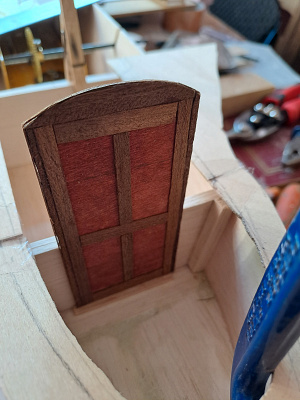
HMCS Snowberry - Revell 1/72 basic kit RC Conversion
My first model boat in many years, and my first RC Conversion! Started making models for my dad and brother's model railway, then sort of got into it a bit. This was an unplanned purchase, bought almost 20 years ago on a rainy day out to York, along with all the required parts needed for the RC conversion.
I got as far as the RC working and hull, decks and wheelhouse done, then it had an accident and fell from the top of a 6' wardrobe and got damaged. All the bits were gathered up and it almost went in the bin, but hubby persuaded me to put it away and look at it another time - he is from Yorkshire so doesn't like to see money wasted!
It sat gathering dust in the back bedroom until November, when hubby decided he wanted to make a wooden sailing ship model, so we got him a couple of kist for his xmas present, and after he started I thought it was time to resurrect Snowberry.
A deep and careful clean removed all the dust, and showed just how much had been lost - the gun baffles, wheelhouse support and walkways, the bridge deck, cabinets, the superstructure under the funnel, and the Hedgehog mortar and bombs all gone!
A daunting bit of scratchbuilding was needed, which I was dreading, but actually I enjoyed the challenge, and once they were replaced I carried on with the build of the rest of the kit, augmenting the crew with some 3d printed figures from ebay, extra decals from Above and Beyond Scale grahics in Canada and some scratchbuild additons - such as the wall mounted cabinets next to the depth charge davits, the hose reels and hoses and a few other bits.
Finally, I weathered, she is painted with enamels and a lot of layers of drybrushing and careful painting were used to provide the beaten-up, hardworking aura of a WW2 convoy escort.
Loved the process, and have had her on the water thrice now, with some lovely comments from folks at New Brighton and Bury Model Boat Club.
🇬🇧 Summerisle
3 days ago
0 Attributes
8 Comments
14 Photos
14 Likes
More Boats That I have Moved on To Other ShipMates Due to Ill Health
Boats I have had to move on due to the weight
🇬🇧 SouthportPat
5 days ago
0 Attributes
6 Comments
1 Photo
8 Likes
12" Century Sea Maid
Not sure the origin. It looks to be a kit, but I'm not sure.
It has a small electric motor, but no RC gear
🇺🇸 DWBrinkman
9 days ago
4 Attributes
3 Comments
2 Photos
10 Likes
Vosper RAF Crash Tender
Recent FB marketplace find.
Never had an engine fitted so planning to sort that and get her on the water for the first time.
🇬🇧 Plivez
10 days ago
1 Attribute
3 Comments
7 Photos
16 Likes
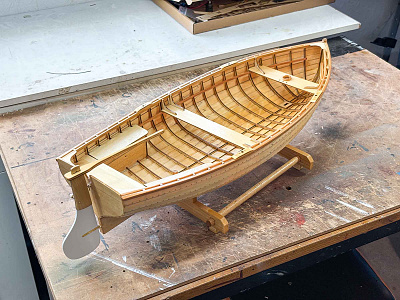
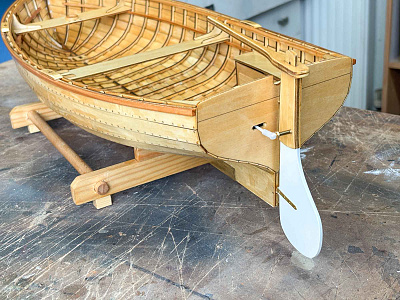
Clyde Model Dockyard Dinghy and Seagull Outboard
Here’s my take on a 1:6 scale clinker dinghy with Seagull outboard motor finished.
This is a laser cut kit from The Clyde Model Dockyard and has been modified with 0.5mm mahogany veneer on the seats, thwarts, rudder and transom. Gunwales changed for laminated mahogany strip. Lots of 3D printed accessories for Frank the fisherman.
Seagull runs like a dream on a 450maH 3S battery. Steering is via a 3D printed yoke mounted to a servo in the aft locker.
🇬🇧 neilw
10 days ago
0 Attributes
6 Comments
4 Photos
13 Likes
Haaringboot
This boat is scratch build, 60 cm.
The original was used to handle the fishing of hering in the Zuidersee. They used fish traps, but after the Zuidersee was closed by a dike and renamed in IJselmeer the hering fishing had to stop.
I used original wood like oak and spruce. The rowing function is done with 4 servo's and an electrical conductor (https://momo-sauerland.de/index.php/modellbau/spezial-losungen/) that allows all rowing functions. On the Sender I only use 2 chanels, forward-rear and left-right.
🇩🇪 Willem
11 days ago
0 Attributes
3 Comments
2 Photos
6 Likes
Fast Patrol Launch
This building this boat at the moment
🇬🇧 Clockmaker
19 days ago
0 Attributes
1 Comment
1 Photo
4 Likes
WeeNip
This yacht is only fun when there is plenty of wind so I only sail it in a good blow
🇬🇧 Clockmaker
19 days ago
0 Attributes
1 Comment
|
|
How-To Articles
ELECTRIC POWER SYSTEM THAT ALLOWS SWITCHING FROM A MAIN BATTERY TO A SPARE BATTERY, FOR SAFER NAVIGA
Revised 28 days ago
By AlessandroSPQR
Why not go back to school?!
Revised 3 months ago
By IGinBasel
LED – SERIES AND PARALLEL CIRCUITS – FLASHING CIRCUITS - Compendium of information
Revised 3 months ago
By AlessandroSPQR
Led Resister chart
Revised 3 months ago
By GARTH
Electric Boat Engine Etc Etc
Revised 6 months ago
By Guy O
Essential or useful tools and utensils for the ship modeler. A final appendix lists the most common
Revised 7 months ago
By AlessandroSPQR
stop email notifications
Revised 7 months ago
By Ace23
painting epoxy over Humbrol and varnish enamels
Revised 10 months ago
By roycv
Cardan joint, Homokinetic joint, universal joint. Problems related to the junction between the engin
Revised 12 months ago
By AlessandroSPQR
various electrical connection diagrams for two motors
Revised 1 year ago
By tomarack
|
|

Login To
Remove Ads
Remove Ads
Model Boats Website
This is the alert text. You can customize this text to be as long or short as needed. The modal height will adjust accordingly.
🛍️ Basket
Go AD FREE & get your membership medal
BRONZE
Less Ads
SILVER
GOLD
Ad Free
Cancel
Anytime
Anytime
£2.50
£4.50
£6.50
Subscribe
Main menu transported here on mobile
Login
Create New Account
Trending Topics
Members Online
Forum
Re: SHIP MODELING: WHICH MODEL COMPANIES ARE STILL ACTIVE? WORLD OVERVIEW, CHARACTERISTICS AND PECUL
Hhager2
4 hours ago
Forum
Re: Animal and nature photos to enjoy.
Ronald
5 hours ago
Forum
Re: Question of the Day?
RossM
7 hours ago
Harbour
Re: canal boat Amelia Rose
matthewwilletts
9 hours ago
Blog
Re: build blog
AlessandroSPQR
18 hours ago
Forum
Re: Some photos from Woods Hole; my homeport
Chum444
18 hours ago
Forum
Re: New planing hull design.
AlessandroSPQR
18 hours ago
Blog
Re: build blog
Madwelshman
20 hours ago
Blog
Re: build blog
AlessandroSPQR
24 hours ago
Forum
Re: Animal and nature photos to enjoy.
DWBrinkman
1 day ago
Harbour
Re: HMCS Snowberry - Revell 1/72 basic kit RC Conversion
Summerisle
1 day ago
Event
Re: Modelboat&modeltrain day
DWBrinkman
2 days ago
Gallery
Re: gallery
Summerisle
2 days ago
Event
BMMMS OPEN DAY
Rookysailor
3 days ago
Blog
Re: build blog
ChrisF
3 days ago
Blog
Re: build blog
chugalone100
3 days ago
Blog
Re: build blog
chugalone100
3 days ago
Harbour
Re: More Boats That I have Moved on To Other ShipMates Due to Ill Health
Northernflotsam
3 days ago
Forum
Re: trying to figure subscription problem out
Northernflotsam
3 days ago
Blog
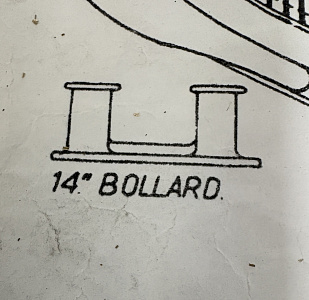
Deck Fittings Complete (at last)
peterbro
4 days ago
Blog
Bollards small size
Kevin55
4 days ago
Forum
Re: 64MB file size limitation - will this be increased?
Nick Ward
4 days ago
Blog
"F" Clamp now available on Thingiverse
LewZ
5 days ago
Gallery
Re: gallery
SouthportPat
5 days ago
Harbour
Re: 12" Century Sea Maid
DWBrinkman
5 days ago
Event
Edina Model Yacht Club "Parade Of Boats"
DWBrinkman
5 days ago
Blog
Video is now the right one
Chum444
6 days ago
Forum
Re: What Engine? Vosper RAF Crash Tender 34"
BOATSHED
6 days ago
Login To
Remove Ads
Remove Ads
🏠
Home
Home
📰
Trending
Trending
💬
Forum
Forum
🗝
Login / Join
Login / Join
|
Cookies are used for ads personalisation.
By using this website you agree to our use of cookies. More Info |
Main Menu
🚤 Model Boats
• Forum
• Build Blogs
• Media Gallery
• Boat Clubs & Lakes
• Events
• Boat Harbour
• How-To Articles
• Useful Links
• The Games Chest
This Website
🔍 Search
📝 Guestbook
👨👩👧👦 Members (1,794)
📣 Support
Login
🗝 Login
🗝 Create New Account
▼
Media Gallery
X
1 of 4
► |
◄ |
Media Viewer
^
_
X
Share
X
Flag Inappropriate Post
X
| Select Reason | |
| Sexual content Includes graphic sexual activity, nudity, and other sexual content. | |
| Violent or repulsive content Violent or graphic content, or content posted to shock viewers. | |
| Hateful or abusive content Content that promotes hatred against protected groups, abuses vulnerable individuals, or engages in cyberbullying. | |
| Harmful dangerous acts Content that includes acts that may result in physical harm. | |
| Child abuse Content that includes sexual, predatory or abusive communications towards minors. | |
| Promotes terrorism Content intended to recruit for terrorist organisations, incite violence, glorify terrorist attacks, or otherwise promote acts of terrorism. | |
| Spam or misleading Content that is massively posted or otherwise misleading in nature. | |
| Infringes my rights Privacy, copyright and other legal complaints. | |
Basket Updated
X
Loading...
Loading
Loading Uploader...